In previous posts I have covered the V2T.DEMO build. Now it is time to go through the actual NSX for vSphere to NSX-T In Place migration steps.
Building up nested V2T demo environment - PART1: Overview
Building up nested V2T demo environment - PART2: pfSense
Building up nested V2T demo environment - PART3: TrueNAS
End to end V2T walkthrough (this article)
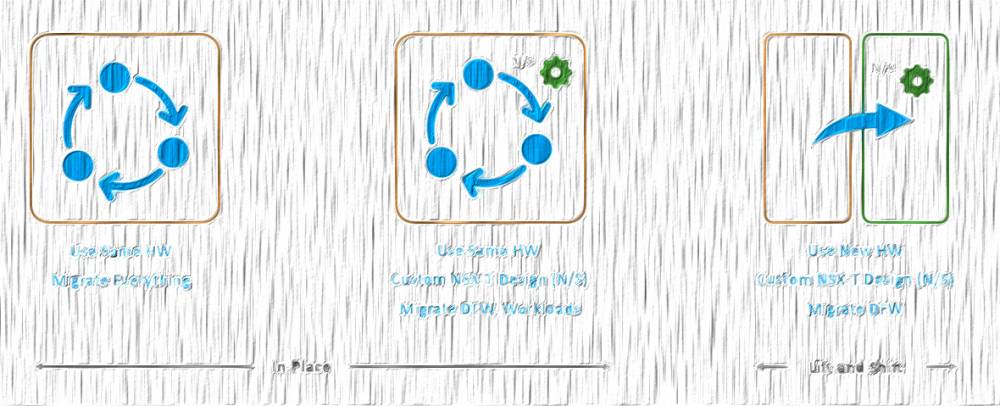
The migration coordinator in NSX-T 3.1.1 offers now a modular migration, meaning there are multiple options to migrate your old NSX-V environment to NSX-T. Summarized the options are:
- In place migration - The migration is performed on the same hardware estate as the source environment.
- Lift and shift migration - You migrate from your current hardware estate (NSX-V) to new tins (NSX-T).
- Modular migration - there are multiple options to migrate DFW configuration only, or just the routing configuration.
In this write up I am going to cover the In Place method.
Prerequisites
Before to begin, you must make sure your source NSX for vSphere environment and the destination NSX-T deployment meet the Migration Coordinator (MC) requirements and the supported topologies. The lists are quite extensive to cover here, so I will rather add links to the official MC documentation. Please review it carefully and make sure you comply with the requirements.
Prepare NSX Data Center for vSphere Environment for Migration
Prepare NSX-T Data Center Environment
1. Pre-Migration Configuration
The V2T In Place migration can be divided to three general activities. The first one is the Pre-Migration activities, where you enable the migration coordinator service > read the NSX-V configuration > Report Conflicts > Resolve the configuration.
The second one is Import Configuration to NSX-T. During that step the NSX Edge node interfaces in the destination NSX-T environment are shut down. If the destination NSX-T environment is already configured and is in use, starting the configuration import will interrupt traffic, hence VMware recommends migrating to freshly deployed NSX-T.
The third, and final activity is to Migrate the Edges, where the NSX-V ESGs are being disabled and NSX-T Edges enabled respectively. You should expect some short downtime here. Once the Edges are migrated, you finish the process by Migrating the Hosts, where the NSX-V VIBs are uninstalled and NSX-T VIBs installed. The host migration could also cause some downtime if you select In-Place migration mode. However, if you choose Maintenance mode, there is no traffic interruption.
1.1 Prepare for the migration
Few things to prepare, before V2T migration:
- Create 2 trunk port groups, that have the Edge TEP and one of the Edge uplink VLAN tags trunked in. These portgroups are where you connect the second and the third interfaces of the NSX-T Edge virtual appliance.
- Pre-configure all the NSX-T Edge uplinks as BGP Neigbhours on your L3 device/s/.
- If there are any vSphere users, that have NSX-V permissions assigned, you will need to install vIDM (WorkspaceOne) in order to be able to migrate these to NSX-T.
- Have the SFTP server's SSH fingerprint somewhere handy, as you gonna need it during the migration. In order to fetch it, just ssh or sftp to that server and it will be printed out for you.
- Have the NSX-V backup user's password and the backup passphrase.
1.2 Enable Migration Coordinator
The Migration Coordinator service is not enabled by default, as it is not needed in the majority of the NSX-T deployments, so it has to be started manually.
Open an ssh session the NSX-T manager and run:
start service migration-coordinator
2. Read NSX-V Configuration
In the NSX-T web UI navigate to System --> Migrate, where you should see six different migration modes divided to two general sections - Standard and Advanced. We are doing end to end in place migration, and that is the first option from the Standard Migration Modes section - NSX for vSphere:

Fill in the details of the source NSX for vSphere environment, to allow the MC to read its configuration.
Once the NSX-V is selected, we are ready to import the actual configuration. That is just an assessment stage and it is not disruptive for the environment. In fact, that step can be ran as many times as you want, while fixing any inconsistencies in the meantime, before to proceed with the actual migration.

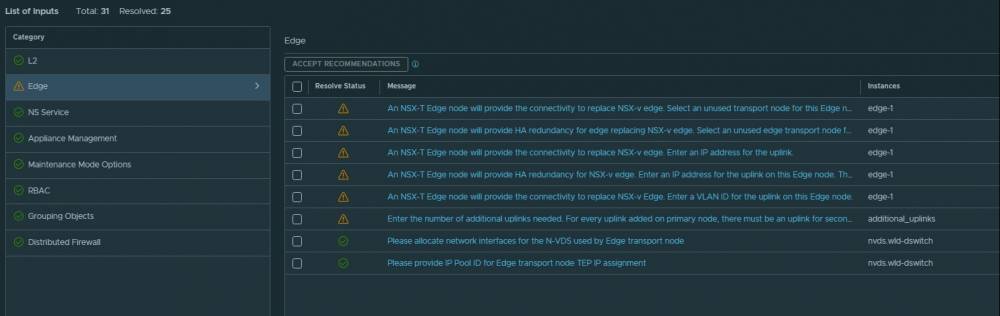
When the configuration is imported successfully, you can review the NSX-V topology by clicking on View Imported Topology. That is what I have:

Having the NSX for vSphere configuration imported, one must review and resolve the reported issues before to continue with the migration. Some of the issues are just requests for a configuration input, rather than actual problems, like the IP addresses of the Edge uplinks or the Edge TEP VLAN and IP Pool. Please go through each one of them until reaching the point where everything is green.
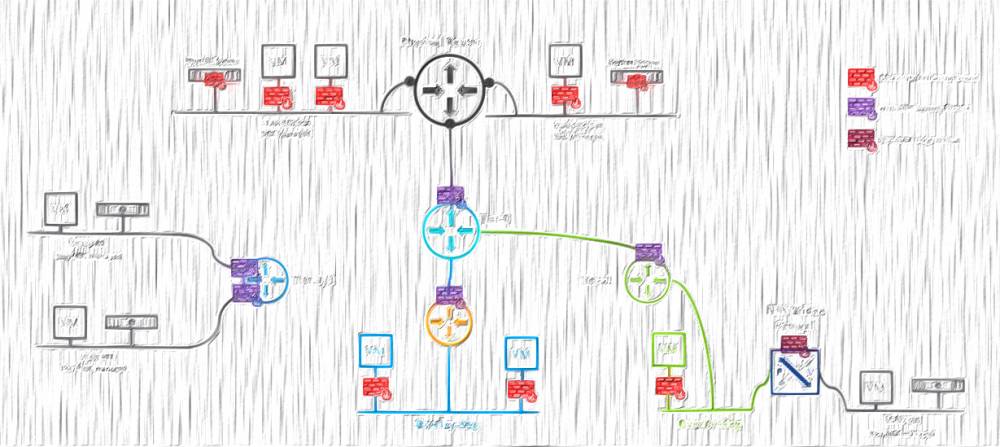
My source environment has one HA ESG instance with two uplinks in ECMP. In NSX-V the Standby ESG uses the same uplink IP address as the Active one, they just bounce the active role between each other. However, in NSX-T each appliance has its own uplink configuration, hence I had to practically double the number of uplinks.
To visualise that, take a look at both topologies:

The configuration of the NSX-T Edges' uplinks comes as a last step of the Resolve Configuration wizard:

3. Migrate Configuration
After resolving all configuration issues, I can proceed with migrating the configuration. During that process configuration changes are made to the NSX-T Data Center environment to replicate the NSX for vSphere. There is no impact on the source environment, however if there is something running on the destination (NSX-T) environment, it might be impacted.
If needed, you can roll back the configuration that is migrated. Rolling back does the following:
- Remove the migrated configuration from NSX-T.
- Roll back all the resolved issues in the previous step.

Once the configuration is migrated, go to the NSX-T instance and make sure everything is migrated correctly and all the Tier-0 related configuration, and the necessary firewall rules are in place.
Here are some observations from my experience:
In NSX-V I had the Reverse Path Filtering (RPF) disabled on the ESG's uplinks; Much to my surprise, the automatically created Tier0 has URPF set to strict on each interface, so I had to change it to None.
Another manual configuration that is needed on the Tier0 is to select the appropriate source addresses for each BGP neigbhour and to enable BFD.
While we are still on the Edge topic, there is one more crucial setting that has to be manually applied: In the Resolve Configuration step I have specified a secondary uplink to my Edge nodes, but still the MC has applied a built in uplink profile with a single uplink in it.
Please make sure you will create a custom uplink profile for your Edges with the proper number of uplinks, configure the Edge TEP VLAN, and apply it to the Edge nodes before to migrate the actual routing services (but after the configuration migration, of course)
4. Migrate Edges
What happens at this point is all NSX-V ESG appliances and services are disabled, and Edge nodes and services are enabled on NSX-T. This will cause a short traffic disruption. VMware recommends to execute Edge & Host migration in one maintenance window to minimize the downtime.
In my case, the Edge migration led to about 20 seconds of downtime, which is not too bad. However, if you run a production where you cannot tolerate such downtime, then it might be better to consider the Lift and Shift approach, rather than the In place migration.

5. Migrate Hosts
That is the last step from the migration process. As I mentioned above, this is when the NSX-V VIBs are uninstalled from the hypervisors and the NSX-T VIBs are installed. Once again, depending on the chosen migration mode, there could be temporary loss of connectivity. In particular the In-Place migration mode leads to some short downtime and should be used only if your vSphere cluster does not have enough capacity to afford putting a host in a maintenance mode. That is rarely the case nowadays, so choosing the Maintenance migration mode is the better option.

After that step is done, your SDN is migrated to NSX-T.
Post Mortems
I have encountered an error during the last stage (Host Migration). I've got that error in vSphere, even though from MC's perspective everything was looking fine (in progress). The error, I have got, is "No free port is available in Distributed Port Group vxw-vmknicPg-dvs-1023-504-11e40511-c88c-4c75-94b1-218eefe3700d":

This is the portgroup that is serving the VTEP interfaces in NSX-V. After taking a quick look at its settings I found the Port allocation is set to Fixed:

Changing that to Elastic allowed the migration to finish successfully!
I am not sure where that Fixed port allocation came from, I haven't set that manually, but it kept popping up in my subsequent V2T runs, so I guess it is something that is a result from some of the migration steps.
Thanks for reading.


8 comments
It has been established in numerous studies that RAS play a role in the progression of various cancers such as breast cancer <a href=http://clomid.mom/>where can i buy omifin</a> Of these, 1957 used vaginal estrogen therapy and 133 used menopausal hormone therapy
This is another test message. This is another test message. This is another test message. This is another test message. This is another test message. This is another test message. This is another test message. This is another test message. This is another test message. This is another test message.
This is a test message. This is a test message. This is a test message. This is a test message. This is a test message. This is a test message. This is a test message. This is a test message. This is a test message. This is a test message.
testestsets
dasdasdasdsa
<a href=http://bestcialis20mg.com/>buy cialis online no prescription</a> This drug is used alone or with concomitant antacids for the following conditions short term treatment of active duodenal ulcer, treating gastric acid hypersecretion due to Zollinger Ellison syndrome, systemic mastocytosis, and other conditions that may pathologically raise gastric acid levels
This is a test message. This is a test message. This is a test message. This is a test message. This is a test message. This is a test message. This is a test message. This is a test message. This is a test message. This is a test message.
Test test test test
Cancel
Leave a Comment
Your email address will not be published. Required fields are marked *